Showing posts with label Tim Holtz. Show all posts

"Gypsy Heart" Mixed Media Canvas

Hello friends, and welcome! Today I want to share with you a little Mixed Media Canvas that I have just finished creating which I've decided to name "Gypsy Heart". 

gyp·sy
ˈjipsē/
a nomadic or free-spirited person. 

 Growing up as a child and into adulthood many times I remember being asked my nationality, and telling people that my family is Hungarian. I can recall many times when people would refer to me as being a gypsy because of my heritage. 
    
Supplies Used:
Bo Bunny craft decorative paper 2 pc (chevron and clocks)
Craft Smart acrylic paints (Robins Egg Blue, Light Pink)
Viva Inka Gold
Liquitex matte medium
White Gesso
Tim Holtz Distress Ink Pad (Vintage Photo)
The Crafters Workshop Stencil - (TCW202s Mini Harlequin)
Michaels flower embellishment (dreamy)
Weldbond glue
Xyron Sticker Maker
metal frame embellishment
Faber-Castell Small Pitt Brush Pen Brown
Scissors/Craft Knife
baby wipes
small paint brush
cosmetic sponge

First I covered the canvas with a piece of Bo Bunnys craft paper by applying matte medium to the canvas with a brush and laying the paper on top of the canvas, then brushing a layer of matte medium over the paper to help seal it to the canvas.


Next I took some white gesso and a damp baby wipe to the canvas to give it a white washed look.  This will help the paints blend better on top of the canvas. 

The same way that I applied the gesso with a damp baby wipe, I also applied the paints with a damp baby wipe putting down color and then pulling up some of the color with the wipes until reaching the colors I wanted.

After getting the color down on the canvas, I used one of the Crafters workshop stencils along with some Viva Inka-Gold and a cosmetic sponge to add some pops of gold harlequin to the background.

I wanted some of the print in the BoBunny craft paper to show thorough in the background.

 I took a piece of lace and ran it through my Xyron Sticker maker to get some adhesive onto the back of the lace, and then stuck it onto the top of the canvas.

After printing out some digital collage pieces from Lisa's Altered Art Shop on Etsy. I cut a few of them out to use on this canvas.  I took the strip of pink and blue harlequin paper and glued it down onto the canvas along with the woman that I though could resemble a gypsy.  

On Lisa's Altered Art Shop I also found some phrase collage sheets, and when I seen the words "gypsy heart" I knew I wanted to use it on this canvas. I applied it right on top of the strip of paper I had glued down. After it was all dry I went around each of the collage pieces with a brown Faber-Castell pitt brush pen and blended it with my finger before the ink could dry. 

Next I took a metal frame embellishment and glued it down around the phrase on to the canvas with some weldbond glue.  I also used the same glue to adhere the flower to the left side of the canvas. 

Last I went around the canvas with some Distress ink to give it a worn look on  the edges.    
Thanks for stopping by and seeing how I created this quick little canvas with some really fun digital collage pieces that were printed and cut out.

I have included a link below so you can check out the Etsy Shop where I have found some of my collage pieces. 

 Enjoy this Fleetwood Mac video of one of my favorite songs. "Gypsy" 

Happy Crafting,
Krystal


Whimsical Mushroom Art Journal Page

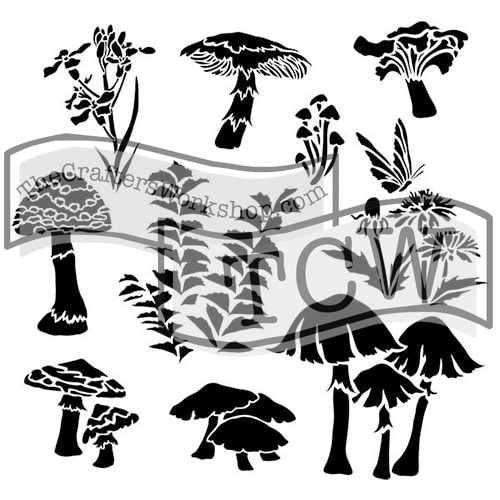
Last week I finished up a canvas using The Crafter's Workshop "Whimsical Shrooms" stencil- TCW578 and I used modeling paste to give the mushrooms a raised textured look.  Today I was working in my art journal putting down layers of paint using various other stencils and when I was done I thought to myself what next?  I seen the "whimsical shroom" stencil sitting next to me and thought it would be fun to use it again in my art journal.  


First I grabbed 5 different Tim Holtz Distress Paints with Sponge Daubers on the ends. Next I got out  a variety of The Crafters Workshop Stencils.  I found it was so easy to apply paint with the stencil onto my page using the distress paints since they had a built in sponge on the bottle.  It was really effortless to apply. 


After I had three or four layers of paint on my page I used some Liquid Acrylic to add some purple to the areas where I still had white showing, bringing up some of the color with a baby wipe.  


For more texture I used a couple of Kaiser Kraft stamps along with some archival ink.  


 Next I got the "Whimsical Mushroom" stencil out and traced around the inside of the stencil with a graphite pencil.  Layering the mushrooms.


After I was finished tracing the mushrooms with a pencil, I colored in the mushrooms with a black fude ball pen.  


I then went around the mushrooms with a white paint pen, adding some spots and dots to the tops of the mushrooms.  I then watered down some white gesso and added some paint splatters to the page. 


I added a butterfly to the page putting some magenta acrylic on it for  a brighter color that would pop.  I then went around the butterfly with a black Derwent inktense pencil to add some shadowing.  


 I added a quote from the Tim Holtz small talk Sticker sheet, also going around the stickers with an inktense pencil like I did to the butterfly.


Thank you so much for visiting the Mixed Media Attic.  If you have any questions or comments I would love to hear from you.  

- Krystal Barto


"Whimsical Mushrooms" Mixed Media Canvas

Hello friends! Welcome to the Mixed Media Attic.  The last few days I have been working on a whimsical mushroom canvas.  Last month I picked up an adorable 12x12 Stencil from The Crafters Workshop called "Whimsical Shrooms" and since buying it I have had so many ideas going through my head on what I wanted to do with this stencil.  Finally after staring at it this whole time, I decided to create a fun little canvas to hang up in my art studio.  
Supplies Used:
12x12 The Crafters Workshop Stencil "Whimsical Shrooms"- TCW578
6x6 The Crafters Workshop Stencil "Mini Tiny Circles" - TCW361s
6x6 The Crafters Workshop Stencil "Mini Sheet Music" - TCW579s
6x6 The Crafters Workshop Stencil "Mini Believe Script" - TCW541s
Artist's Loft Super Value Canvas 8in. x 10in.
Hazel and Ruby Pass the tissue "Ephemera Collage"
Liquitex Light Modeling Paste
Weldabond glue
Ranger Glossy Accents
Liquitex Matte Medium
Ohto Fude Ball Pen 1.5 "Black"
Posca Paint Pen - "White"
Palette Knife
Paint brush
Makeup Sponges
Tim Holtz Stickers: "Small Talk"
Prima Marketing Resin Icons 
Prima Marketing Color Bloom Spray: "Gold Foil"
Liquitex Heavy Body Acrylic: "Bright Aqua Green" and "Medium Magenta"
Daler Rowney Liquid Acrylic: "Moon Violet, and Gold"
Tim Holtz Distress Paint: "Chipped Sapphire, Peacock Feathers, Mermaid Lagoon, and Cracked Pistachio"
Faber-Castell Gelatos: "Metalic Melon, Red Cherry, Lavender, Bubble Gum, Iced Chai, Gold Champagne, and Iced Coffee."


Steps:
1. Covered the canvas with a layer of Matte Medium, next laid down the tissue paper or collage paper, then added another layer of Matte Medium on top of the tissue paper to help seal it to the canvas.  Let dry
2.  Put down some Tim Holtz Distress Paints for the background. Let Dry.  Use some Liquitex Heavy Body acrylic paint and makeup sponges with The Crafter's Workshop stencils, to and layers to the background.  Let dry
3. Take The Crafters Workshop "Whimsical Shroom" Stencil, and wipe some modeling paste over the stencil to add some textured mushrooms to the canvas. Let dry.
4. Take some paints, and Faber-Castell gelatos to add bright color to the mushrooms.


5. Used some Spray ink to the resin fairy embellishments to add some gold sparkle, then glued them down to the canvas.
6.  Added some Ranger glossy accents to the butterfly, and parts of the mushroom for added shine.  
7. Used a Fude ball pen to go around the mushrooms to add some definition.  
8.  Added a Tim Holtz quote sticker to the canvas. Going around it in white.

9.  For detail I added some little white dots to the tops of the mushrooms. 
I have included a little video on the making of this whimsical mushroom canvas below. I hope you have enjoyed this and maybe some inspiration was sparked for you to create a fun canvas of your own.  Leave me a comment, I'd love to hear from you.  I hope you enjoy the process video!


Thanks for stopping by!

Krystal Barto


Art Journal Week 37 DLP - What makes your heart sing?


September Theme
Journaling with Photos
September 12
Art Challenge: Digital Imagery & Design
Journal Prompt:  What Makes Your Heart Sing?


Zazu is what makes my heart sing every day.  Meet my 2 year old Congo African Grey Parrot.  She recently had her 2 year hatch day on September the second.  A hatch day for a bird is the equivalence to a birthday for humans. I have hand raised this little gem since she was 6 weeks old.  She is so loving, chatty, and smart, most of all she has such a special place in my heart. When I seen what the journal prompt was I knew that I was going to pay tribute to her this week, which lead to her being the star of my layout.  


For the art challenge of using digital imagery and design, I first started with this photo I took of Zazu while we were outside enjoying the sunshine together on my I Phone. I used a photo editing app to edit and crop the photo.  I then uploaded the photo to my computer. 


As some of you may know from previous blog post, I have a Silhouette Cutting Machine and use it all the time!  There is a Silhouette Design Software program that you can download onto your computer that goes with the  Silhouette machine.  With the  Silhouette Design software I was able to upload the photo edited of Zazu and put a floral frame around the photo.  Next I had a watercolor image uploaded to the software. I then searched the Silhouette store for a scallop border, once I found one that I liked I uploaded the scallop border image with the watercolor imaged and made about 6 scallop borders that I wanted to put around the pages.  


Once I had my images ready to go I sent the designs to the printer, and put the photocopy of them on the sticky cutting mat and loaded it into the machine, then I sent the designs to the Silhouette machine to cut out around each of the images for me.  After all my digital images were designed, and cut I began putting down tissue paper by Tim Holtz to cover the background.  


Next I Put down a few different layers paint, drips and splatter.  I wanted to add some texture, so I used a few different stamps in the background.  Next I adhered the scallop borders around the pages with a matte medium.  


Then I adhered the photo of Zazu, and the alpha stickers to the other side of the page that read;  "Zazu you make my heart sing." Afterwards I used a white sharpie to doodle around the scallop border and the floral frame, then using a black fude ball pen I out lined the letters, and doodled circles inside the scallop border, and with that called it done.  
Thanks for stopping by, I would love to hear from you, so please comment below.
  
xoxo
Krystal

Photo Transfer - The Documented Life Project Week 36


September Theme
Journaling with Photos
September 5th
Art Challenge: Photo Transfer
Journal Prompt:  From Here to There


Can I please just start off by saying, how much I loved doing this challenge! Every Saturday on my local PBS station there is a T.V. show called Scrapbook Soup, and on this show I had watched a segment of them doing a photo transfer using packing tape.  I never had tried this technique up until this weeks challenge.   It was pretty simple and turned out good on the first try. 


Steps for photo transfer:

1. Print an image using a laser printer. (The Image I used was from a 1960 Fashion photographer named Sir Norman Parkinson.)

2. layer strips of transparent packing tape over the printed image,*Be sure to overlap the tape. 


3. Take the image covered in tape and submerge it in a dish of water. The image was printed on a heavy card stock, and I soaked the image for about 1 minute.


4. Begin rubbing the paper off from the tape with your fingers, until all paper is gone


5. Voila! You will have a photo transfer.


After making my photo transfer I put down some "book text" tissue paper. For the background I used some of the Tim Holtz Distress paints, and a pop of pink liquid acrylic.  Martha Stewart, and Recollections flowers were used to embellish the bottom of the page, and to help fill in the gap at the bottom of the photo transfer. 


The quote used on my page went with the journal prompt "from here to there".  I wanted to print it out off  the computer, cut down the paper and layer in onto the page. 


I wanted to give the page some texture, so I used a Tim Holtz Stencil with some Ranger texture paste to get the raised ruler look at the bottom of the page. The page was still looking bare, so I sprayed a paper doily with some pink tattered angels spray mist, and gold Color spray from Heidi Swapp. I went around the quote and doily with a brown Faber-Castell Pitt Brush marker to help blend it all into the page, and give it some shadow. Calling this one done.

I love the look of doing this photo transfer method.  There are many other ways to do it out there but since I had already seen this technique done and it seemed to be the easiest I had to give it a try.  I can't wait to try this again on other projects and on other journal pages.  For someone who can't draw (like me) the photo transfer method takes your creating abilities to a new level! Thanks for visiting my page today, below I have posted my process video for making this weeks layout.  Please Like, Comment, and Share, I want to hear from you!  


Happy Crafting!
Krysal Barto


The Documented Life Project Week 29: "Photographs & Memories" Art Journal

The Documented Life Project
Week 29

July Theme
Ephemera
July 18
Art Challenge: Photographs & Memories
Journal Prompt:  "All that I have to remember you"-Jim Croce

"Photographs and memories
All the love you gave to me
Somehow it just can't be true
It's all I've left of you"


Those were the lyrics that I heard after I was curious who Jim Croce was after reading this weeks Journal Prompt, when my curiosity took me to YouTube, where I heard this song called Photographs and Memories by Jim Croce.  Instantly while listening to the song memories of summers spent at grandpas house flooded my head.  Many of the lyrics to this song took me back to what I do have left of him, which are photos, old cards, and cherished memories of time spent together while he was still here on this earth with us.  I have posted the video here so you may hear this classic song, that may very well bring back some memories for you as well. 


Each month there is a theme and for July it is to use ephemera.  So for the background I collaged many pieces of ephemera for the Tim Holtz "thrift shop"  ephemera pack.  A few other pieces were from the Ruby Rock It pack of die cuts, and some from a piece of scrapbook paper that had tags and tickets were cut out from them. Many of the pieces were picked out intentionally because I found some meaning in them.  For instance there is a U.S. map, my grandpa was a rambling man back in his earlier years traveling all around the country, and never settling any where very long.  Two other pieces used were referenced to a type writer.  Some memories being at grandpas house were of him letting me use his old antique type writer and learn how to use it in an error where computers were coming out into popularity.


Lace was added to the to left hand page to give it a little more of a shabby vibe to go with the flowers put by the framed pictures, of my Grandpa, and the doily cut from a piece of scrapbook paper.


"Photographs and memories
All the love you gave to me
Somehow it just can't be true
It's all I've left of you"

Thank you for visiting and taking a trip down memory lane with me, as I went back to them summer days.  Be sure to comment below, I would love to hear from you all.

Happy Craftin'
Krystal


The Documented Life Project 2015 : Week 25 "There's no place like home."


Can you believe we are in the 25th week of the year already? Is it just me, or has this year really gone by fast? It seems each year goes by faster than the last.  The earliest memories I have were with my mother at my grandfathers house laying in my crib.  That had to have been about 25 years ago.  To look back to memories at my grandfathers house through the years are some of the best times I had while growing up in my hometown in Ohio.  

If you have been following my blog these last few weeks you may know that I have been participating in The Documented Life Project 2015.  Each Saturday the ladies from Art to the 5th put up a Weekly Challenge, and each month there is a new theme.  

June Theme
Travel Journaling
June 20
Art Challenge: Hometown Inspiration
Journal Prompt:  There is no place like home

 I wanted to do a fun house scene for this weeks challenge for my "home town inspiration" .  You can see in the photos and in my YouTube video below, that on the house there is an address.  Memories of my hometown were at my grandpas house.  The address 362 does have some meaning.  


Supplies Used:
Dyan Reaveley's Dylusions Creative Journal
Liquitex Matte Medium
Liquitex Basics Acrylic Gesso
Tim Holtz Distress Paint
Tim Holtz Distress Stain
Faber-Castell Pitt Brush Markers
Halmark tissue paper


The clothes line reminded me of my grandfathers neighbor Velma.  She was a sweet old lady that didn't mind if my 5 year old imagination took me playing in her yard, and sometimes on the metal bars of her clothes line.  I thought I was a gymnast.  


I really enjoyed doing this weeks challenge, and reflecting back on the many memories at grandpas house.  Below is a video that I have made while creating this layout.  


I hope you enjoyed the video! xoxo