"Gypsy Heart" Mixed Media Canvas

Hello friends, and welcome! Today I want to share with you a little Mixed Media Canvas that I have just finished creating which I've decided to name "Gypsy Heart". 

gyp·sy
ˈjipsē/
a nomadic or free-spirited person. 

 Growing up as a child and into adulthood many times I remember being asked my nationality, and telling people that my family is Hungarian. I can recall many times when people would refer to me as being a gypsy because of my heritage. 
    
Supplies Used:
Bo Bunny craft decorative paper 2 pc (chevron and clocks)
Craft Smart acrylic paints (Robins Egg Blue, Light Pink)
Viva Inka Gold
Liquitex matte medium
White Gesso
Tim Holtz Distress Ink Pad (Vintage Photo)
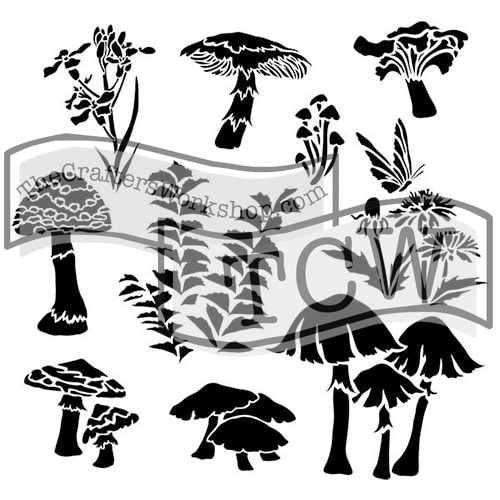
The Crafters Workshop Stencil - (TCW202s Mini Harlequin)
Michaels flower embellishment (dreamy)
Weldbond glue
Xyron Sticker Maker
metal frame embellishment
Faber-Castell Small Pitt Brush Pen Brown
Scissors/Craft Knife
baby wipes
small paint brush
cosmetic sponge

First I covered the canvas with a piece of Bo Bunnys craft paper by applying matte medium to the canvas with a brush and laying the paper on top of the canvas, then brushing a layer of matte medium over the paper to help seal it to the canvas.


Next I took some white gesso and a damp baby wipe to the canvas to give it a white washed look.  This will help the paints blend better on top of the canvas. 

The same way that I applied the gesso with a damp baby wipe, I also applied the paints with a damp baby wipe putting down color and then pulling up some of the color with the wipes until reaching the colors I wanted.

After getting the color down on the canvas, I used one of the Crafters workshop stencils along with some Viva Inka-Gold and a cosmetic sponge to add some pops of gold harlequin to the background.

I wanted some of the print in the BoBunny craft paper to show thorough in the background.

 I took a piece of lace and ran it through my Xyron Sticker maker to get some adhesive onto the back of the lace, and then stuck it onto the top of the canvas.

After printing out some digital collage pieces from Lisa's Altered Art Shop on Etsy. I cut a few of them out to use on this canvas.  I took the strip of pink and blue harlequin paper and glued it down onto the canvas along with the woman that I though could resemble a gypsy.  

On Lisa's Altered Art Shop I also found some phrase collage sheets, and when I seen the words "gypsy heart" I knew I wanted to use it on this canvas. I applied it right on top of the strip of paper I had glued down. After it was all dry I went around each of the collage pieces with a brown Faber-Castell pitt brush pen and blended it with my finger before the ink could dry. 

Next I took a metal frame embellishment and glued it down around the phrase on to the canvas with some weldbond glue.  I also used the same glue to adhere the flower to the left side of the canvas. 

Last I went around the canvas with some Distress ink to give it a worn look on  the edges.    
Thanks for stopping by and seeing how I created this quick little canvas with some really fun digital collage pieces that were printed and cut out.

I have included a link below so you can check out the Etsy Shop where I have found some of my collage pieces. 

 Enjoy this Fleetwood Mac video of one of my favorite songs. "Gypsy" 

Happy Crafting,
Krystal


Week 5 of Lent & Holy Week in my Journaling Bible

Hello friends!  As Lent comes to an end I wanted to share with you the rest of my pages in my journaling Bible, that correlated with the She Reads Truth Lent Devotional.  You can check out their site below:

A few weeks ago I ordered some Illustrated Faith stickers, and die-cuts along with their new Beautiful Devotional Kit by Valerie Wieners.  I ended up using quite a few of my new goodies to create many of my pages these last few weeks.

I wanted to make a little door to go with the verse below.

Keeping it simple using some washi tape, stamps, and alpha stickers.  
                                   

The start of Holy Week: Palm Sunday 
"Hosanna in the highest." 

Below I used the tag that was in the Illustrated Faith News Letter, where a free set of Printables was included. I wanted to try out the new Illustrated Faith Pebeo Acrylic Paints.  I swiped some paint onto the page using an old gift card with three different colors, next I watered down some paint and added it into the areas where I still had white showing.  I added some alpha stickers for the verse and outlined them with a pen.  I love the watercolor look from the paints. 
On Tuesday this past week as many of you know there was an attack in Brusseles, Belgium.  I wanted to pray tribute to the horrific events of the day, and it really went with a verse from the Lent devotional.

"Then he said to them, "Nation will rise against nation, and kingdom against kingdom.  There will be great earthquakes, and there will be terrors and great signs from heaven." (Luke 21:10,11) 

Here I wanted to draw an alabaster jar.  This verse reminded my of a song by Rend Collective. I wanted to share it with you all here below:
"I am broken at Your feet
Like an alabaster jar
Every piece of who I am
Laid before Your majesty

I will bow my life
At Your feet, at Your feet
My lips, so lost for words
Will kiss Your feet, kiss Your feet"

Here I used up some of the free printables from the Illustrated Faith News Letter, and added some journaling of the verse to the margin.
                         

Using more of the free printables and some alpha stickers for my Good Friday page. I journaled some Lyrics to a Chris Tomlin song that I thought, the words go perfect for Christ sacrafice on the cross for us.
                         
"At the cross
At the cross
I surrender my life
I'm in awe of You
I'm in awe of You
Where Your love ran red
And my sin washed white
I owe all to You
I owe all to You Jesus"

Last is my page for Easter Sunday.
                          
Now the stone was rolled away, and Christ is risen.  He is risen indeed!

God Bless you, and thanks for visiting.
Krystal


Whimsical Mushroom Art Journal Page

Last week I finished up a canvas using The Crafter's Workshop "Whimsical Shrooms" stencil- TCW578 and I used modeling paste to give the mushrooms a raised textured look.  Today I was working in my art journal putting down layers of paint using various other stencils and when I was done I thought to myself what next?  I seen the "whimsical shroom" stencil sitting next to me and thought it would be fun to use it again in my art journal.  


First I grabbed 5 different Tim Holtz Distress Paints with Sponge Daubers on the ends. Next I got out  a variety of The Crafters Workshop Stencils.  I found it was so easy to apply paint with the stencil onto my page using the distress paints since they had a built in sponge on the bottle.  It was really effortless to apply. 


After I had three or four layers of paint on my page I used some Liquid Acrylic to add some purple to the areas where I still had white showing, bringing up some of the color with a baby wipe.  


For more texture I used a couple of Kaiser Kraft stamps along with some archival ink.  


 Next I got the "Whimsical Mushroom" stencil out and traced around the inside of the stencil with a graphite pencil.  Layering the mushrooms.


After I was finished tracing the mushrooms with a pencil, I colored in the mushrooms with a black fude ball pen.  


I then went around the mushrooms with a white paint pen, adding some spots and dots to the tops of the mushrooms.  I then watered down some white gesso and added some paint splatters to the page. 


I added a butterfly to the page putting some magenta acrylic on it for  a brighter color that would pop.  I then went around the butterfly with a black Derwent inktense pencil to add some shadowing.  


 I added a quote from the Tim Holtz small talk Sticker sheet, also going around the stickers with an inktense pencil like I did to the butterfly.


Thank you so much for visiting the Mixed Media Attic.  If you have any questions or comments I would love to hear from you.  

- Krystal Barto


Mixed Media Supply Shopping Haul

Today I wanted to share with you all my shopping haul from Tuesday Morning, Michael's, and Hobby Lobby.  I scored some really great deals, and used a few coupons. Check out my video below to see all the neat mixed media and art journaling supplies that I found. 


Thanks for visiting and checking out my latest haul!

Krystal Barto

"Whimsical Mushrooms" Mixed Media Canvas

Hello friends! Welcome to the Mixed Media Attic.  The last few days I have been working on a whimsical mushroom canvas.  Last month I picked up an adorable 12x12 Stencil from The Crafters Workshop called "Whimsical Shrooms" and since buying it I have had so many ideas going through my head on what I wanted to do with this stencil.  Finally after staring at it this whole time, I decided to create a fun little canvas to hang up in my art studio.  
Supplies Used:
12x12 The Crafters Workshop Stencil "Whimsical Shrooms"- TCW578
6x6 The Crafters Workshop Stencil "Mini Tiny Circles" - TCW361s
6x6 The Crafters Workshop Stencil "Mini Sheet Music" - TCW579s
6x6 The Crafters Workshop Stencil "Mini Believe Script" - TCW541s
Artist's Loft Super Value Canvas 8in. x 10in.
Hazel and Ruby Pass the tissue "Ephemera Collage"
Liquitex Light Modeling Paste
Weldabond glue
Ranger Glossy Accents
Liquitex Matte Medium
Ohto Fude Ball Pen 1.5 "Black"
Posca Paint Pen - "White"
Palette Knife
Paint brush
Makeup Sponges
Tim Holtz Stickers: "Small Talk"
Prima Marketing Resin Icons 
Prima Marketing Color Bloom Spray: "Gold Foil"
Liquitex Heavy Body Acrylic: "Bright Aqua Green" and "Medium Magenta"
Daler Rowney Liquid Acrylic: "Moon Violet, and Gold"
Tim Holtz Distress Paint: "Chipped Sapphire, Peacock Feathers, Mermaid Lagoon, and Cracked Pistachio"
Faber-Castell Gelatos: "Metalic Melon, Red Cherry, Lavender, Bubble Gum, Iced Chai, Gold Champagne, and Iced Coffee."


Steps:
1. Covered the canvas with a layer of Matte Medium, next laid down the tissue paper or collage paper, then added another layer of Matte Medium on top of the tissue paper to help seal it to the canvas.  Let dry
2.  Put down some Tim Holtz Distress Paints for the background. Let Dry.  Use some Liquitex Heavy Body acrylic paint and makeup sponges with The Crafter's Workshop stencils, to and layers to the background.  Let dry
3. Take The Crafters Workshop "Whimsical Shroom" Stencil, and wipe some modeling paste over the stencil to add some textured mushrooms to the canvas. Let dry.
4. Take some paints, and Faber-Castell gelatos to add bright color to the mushrooms.


5. Used some Spray ink to the resin fairy embellishments to add some gold sparkle, then glued them down to the canvas.
6.  Added some Ranger glossy accents to the butterfly, and parts of the mushroom for added shine.  
7. Used a Fude ball pen to go around the mushrooms to add some definition.  
8.  Added a Tim Holtz quote sticker to the canvas. Going around it in white.

9.  For detail I added some little white dots to the tops of the mushrooms. 
I have included a little video on the making of this whimsical mushroom canvas below. I hope you have enjoyed this and maybe some inspiration was sparked for you to create a fun canvas of your own.  Leave me a comment, I'd love to hear from you.  I hope you enjoy the process video!


Thanks for stopping by!

Krystal Barto


Bible Journaling Week 2, and 3 of Lent

Hello, and welcome to The Mixed Media Attic!  I have been doing the She Reads Truth Lent Devotional these last three weeks now.  If you missed my post from the first week of Lent and would like to check it out, I have the link posted below:

The last three weeks I have been digging deeper into the word, and spending more time with God. During the second week, I did fall behind as the flu bug got me that has been going around.  Feeling better now and ready to share with you all some of my pages from my Journaling Bible.
On Day 8 I had posted my photo on my instagram account.  As many of you may know of Illustrated Faith, well all Glory to God.... My photo was featured on their Instagram feed! I was so stoked!  


One of my favorite prayers

On day 12 I wanted to try my own hand lettering, something that I do not like.  I went out on a limb and decided to try lettering without doing it in pencil first.  After laying down the ink, of course I was unhappy with my hand lettering.  But what I want to show you here is, I tried.  I may not like my results but its imperfect, and that is ok.

Same here on day 13 I wanted to try my own hand lettering, I was happy with the results, except for the I in Him, but after looking at it and grumbling and fussing with the imperfection in my lettering I realized that I was getting better and I took my time rather than rushing like the day before.


Again trying my luck with my own lettering, I opted out of using pencil first and going over it later with a pen, and dove right in with ink.  I regretted that decision yet again.  Imperfections are what makes my journaling bible unique right?

Here was my first attempt at trying to paint messy flowers.... I got the messy down.

7 day series of in the book of Jonah 


I love to listen to praise and worship music while journaling in my Bible.  One song I found my self listening to that went with day  15  was a hymn called "I Need Thee Every Hour"  I found a beautiful version of this on YouTube done by Joey and Rory that I have shared with you all below,

 
Thanks for visiting! 
God Bless, 
Krystal